This page describes how to obtain, build, and test the C source code that
accompanies each algorithm1. Working with the code isn’t a hard
requirement for comprehension of this content. However, it’s highly
recommended. The content and source code are synergistic. Perusing prose and
pseudocode generates conceptual understanding and working with source code
builds applied skill which in turn enriches conceptual understanding.
graph LR
    YOU([fas:fa-user])
    STUDY([fas:fa-book Study])
    CON([fas:fa-brain Concepts])
    APP([fas:fa-sign-language Application])
    SKILL([fas:fa-cogs Skill])

    YOU-->STUDY-->CON-->APP-->SKILL-->CON
    CON-->STUDY
It bears to reason that aspirations and time commitments vary. Therefore, listed below are some viable approaches in regard to the source code. You should adopt the approach that best aligns with your goals and availability.
- Ignore the code. While you’ll no doubt learn a great deal, it’s safe to say that you won’t master the content using this approach.
- Read the code. This will give you a sense of the divergence between the real and purely theoretical worlds; however, it will not facilitate skill building.
- Experiment with the code. Thoroughly scrutinize the supplied source code, modify it and try to predict outcomes. This will provide a visceral connection to the concepts and deepen comprehension; however, pupils using this approach may find it difficult to apply algorithms to other contexts.
- Write your own code. Implement each algorithm in your language of choice using the supplied source code as a “measuring stick” by which to evaluate your implementations. This approach is by far the best way to achieve the skills required to apply algorithms to real-world contexts.
If you chose approach 1 or 2, feel free to skip the rest of this page as well as the Style Guide page because everything you need is available via your browser. Those choosing options 3 and 4 should continue on to learn how to configure a suitable development environment.
PRO TIP: As a bear minimum, all software project should contain build and development environment documentation. This page and the Style Guide page are suitable templates. Make sure this is among your first tasks when setting up a new project.
Operating System
Conceivably, the supplied source code should build and run on any OS capable of hosting the tools outlined in the next section. However, it has only been verified with those listed below.
One of these Operating Systems are recommended; however, users have reported success using Windows PowerShell and various versions of macOS. As a consideration, deviating from the recommendation may require modification of the supplied automation scripts2.
Development Tools
There are two local development environment options: containerized3 or configured. The containerized environment option requires much less setup but is more difficult to integrate with a code editor. Either approach is viable. The tables below outline the required tools for both options.
Containerized Environment4
| Tool | Description |
|---|---|
| Git | Distributed version control system |
| Bash | CLI |
| Docker or Podman5 | Container engine |
Configured Environment
| Tool | Description |
|---|---|
| Git | Distributed version control system |
| Bash | CLI |
| Python 3 | Programming language used for tooling automation |
| pip | Package manager for Python |
| make | Build automation tool |
| lcov | Code coverage tool |
| gprof | Performance profiling tool |
| clang-156 | Open source compiler for the C family of languages |
| clang-format-15 | Tool for automatically formatting source code |
| clang-tidy-15 | Lint and static analysis tool |
| cpplint | Lint and static analysis tool designed to enforce the Google C++ Style guide. |
| CUnit | C unit test framework |
| compiledb | Tool to generate a compilation database which is required for editor integration. |
| lldb-15 | Debugger |
Instructions for setting up the tools is out of scope. Consult the provided links for more information. Alternatively, the included Dockerfile documents how to configure the tools on Ubuntu 22.04.
Finally, you will need a code editor. VIM7, Visual Studio Code, and CLion are all popular alternatives. Feel free to use absolutely any editor that you are comfortable with.
Obtaining the Source Code
All the code is located within a single GitHub Repository. Use the bash command below to clone it to your local machine.
git clone https://github.com/dalealleshouse/algorithms.git
The general layout of the repository is shown below8.
algorithms/
├── src
│   ├─── [algorithm type]       <- Related algorithms/data structures are grouped into folders
│   │   ├── test_data           <- Optional: folder to hold test data
│   │   │   └── ...
│   │   ├── algo_timer.c        <- Optional: records algorithm execution time with various input sizes
│   │   ├── compare_times.py    <- Optional: arranges data generated by algo_timer.c into charts and tables
│   │   ├── time_charts.sh      <- Automation script for exercising compare_times.py
│   │   ├── [algorithm].c       <- Each algorithm/data structure has one or more dedicated c and header file
│   │   ├── [algorithm].h
│   │   └── [algorithm]_test.c  <- Unit tests files are postfixed with _test
│   └── test_runner.c           <- Coordinates all unit tests
├── .clang-format               <- clang-format configuration file
├── .clang-tidy                 <- clang-tidy configuration file
├── CPPLINT.cfg                 <- cpplint configuration file
├── Dockerfile                  <- Docker build file that specifies the container
├── Makefile                    <- Specifies build parameters
├── build_container.sh          <- Script to build container
├── ci_validate.sh              <- Script executed by the CI server to validate project
├── compile_commands.json       <- Compalation database required for code editor integration and tooling support
├── coverage.sh                 <- Creates a unit test coverage report
├── llvm-gcov.sh                <- Script required by gcov for coverage report
├── prof.sh                     <- Prints gprof performance profile report to stdout
├── run_c.sh                    <- Automation script for executing build/test commands inside the container
├── validate.sh                 <- Runs all validation checks required for code commit
├── validate_format.py          <- Automation script that validates code formatting
└── watch.sh                    <- Watchs source files and run tests when any file changes
Building and Testing
The configured build and test tasks are listed in the table below. Please
attempt to run each of them to ensure your system is configured
properly9. Make sure to execute each bash command from the
repository’s root directory and run make clean in between each task to
alleviate caching problems.
| Operation | Configured Env. | Containerized Env. |
|---|---|---|
| Delete all build artifacts | make clean |
./run_c.sh "make clean" |
| Build and run tests | make |
./run_c.sh make |
| Build and run tests with release optimizations10 | make release |
./run_c.sh "make release" |
| Build and run tests with clang memory sanitizer | make memory-san |
./run_c.sh "make memory-san" |
| Build and run tests with clang thread sanitizer | make thread-san |
./run_c.sh "make thread-san" |
| Build and run tests with clang address sanitizer | make address-san |
./run_c.sh "make address-san" |
| Generate a compilation database | make comp-db |
./run_c.sh "make comp-db" |
| Run cpplint on all source files | make lint |
./run_c.sh "make lint" |
| Auto-format all code files using clang-format | make format |
./run_c.sh "make format" |
| Run clang-tidy static analysis on all code files | make tidy |
./run_c.sh "make tidy" |
| Run all validation checks | ./validate.sh |
./ci_validate.sh |
| Generate performance profile report using gprof | ./prof.sh |
./run_c.sh ./prof.sh |
| Create code coverage report lcov11 | ./coverage.sh |
./run_c.sh ./coverage.sh |
| Start the lldb debugger | ./debug.sh |
./run_c.sh ./debug.sh |
The clang undefined behavior sanitizer is enabled for all builds except release. It may seem anomalous that each sanitizer has a separate build; however, it’s not technically possible to use the memory, thread, and address sanitizers together. Sanitizers work by instrumenting code and reporting errors during runtime. This is why the unit tests must be run separately for each build. The tests run automatically after build for convenience12.
Validating the Code
C is an exceptionally powerful language. However, as the Peter Parker
principle attests, “with great power come great responsibility”13.
It’s easy to do something heinously unnatural with C without even knowing it.
All languages have idiosyncrasies; however, C’s are particularly prolific.
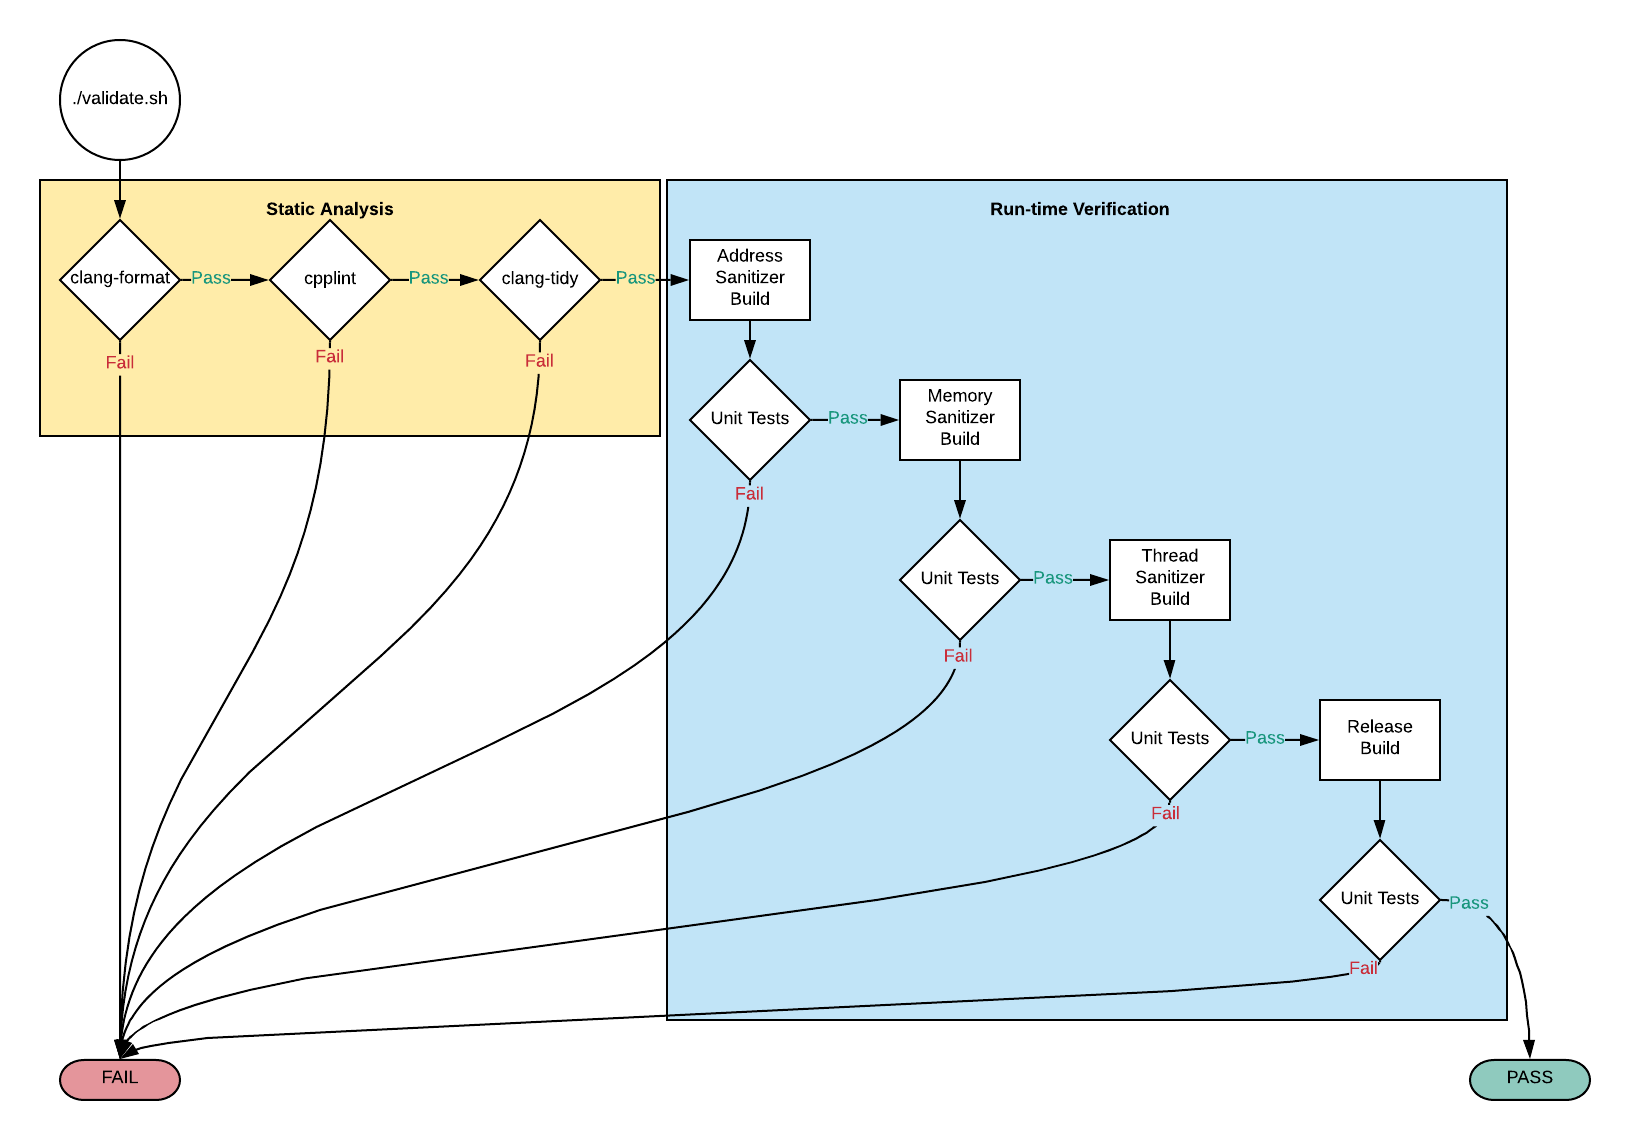
Automated validation14 is the most effective stop gap for
common errors. For this project, automated validation is achieved via four
primary means:
- Static Analysis: Analyse code, without running it, for common error and
security problems
- Tooling: clang-tidy
- Linting15: Analyse code for stylistic issues (more on this on the
Style Guide page).
- Tooling: cpplint
- Unit Tests: Manually written executable tests that verify run-time
functionality.
- Tooling: CUnit
- Dynamic Analysis: Analyze code for errors and security problems by instrumenting and running it.
The graphic below illustrates all the validation steps that the source code must endure before acceptance of a commit. The previous section has instructions for initiating validation.
PRO TIP: It’s not reasonable to expect developers to remember corner cases and idiosyncrasies. Every project, regardless of language, should have an easy and fast means of validation. This project serves as an acceptable template.
Implementation Quality
This project makes every attempt to demonstrate best practices for C
development. It can act as a reasonable starting point for any DevOps enabled
production development effort. However, as a disclaimer, this is NOT
production hardened code. Before using C in production scenarios, please
preform additional research to ensure the safety of your implementation.
Below are some known likely shortcomings, depending on your context.
- There isn’t a production build that excludes test code. This step was purposely omitted because it’s not a requirement.
- There is only one level of testing. Productions scenarios would also utilize integration, end-to-end, and performance tests.
- Several of the implementations utilize recursion. Recursion provides an elegant means of demonstrating algorithms; however, it causes stack overflow exceptions when the input is sufficiently large16. For many purposes, this is not an issue; however, use in production scenarios should be thoroughly scrutinized.
- The
Ccode makes extensive use of therand()17 function without seeding (srand()). This ensures that the actual run time comparisons between algorithms using random data use the exact same inputs. - There is little to no thought given to
Ccode portability. It is assumed that it will always run in the supplied container on a 64-bit machine.
Actual Run Times
Where appropriate, actual run time data is provided in order to demonstrate the temporal impact of algorithm and data structure choices. This is instrumental for comprehension of asymptotic complexity. The data is generated by two code files, which are located within each target algorithm’s directory18.
algo_timer.c: Determines the run time incurred by performing operations with various input sizes.compare_times.py: Arranges data generated byalgo_timer.cinto charts and tables
All run time data shown on this site19 was collected using a container running on a Surface Book 2 Laptop (Intel Core i7, 16 GB RAM). In order to generate the data on your own machine, execute the following commands from the repository’s root directory:
mkdir run_time_data
./run_c.sh "make clean"
./run_c.sh "make shared"
./run_c.sh "python3 <path to target algorithm directory>/compare_times.py"
It may take up to two hours to generate the data. The charts and tables will
output to the run_time_data directory created with the first command.
WARNING: It’s easy to erroneously interpret the nuanced meaning of run time charts. It’s highly recommended that you fully grasp Asymptotic Analysis before attempting to decipher the charts.
Pull Requests
I will happily accept pull request that meet the following criteria:
- The request is made against the
devbranch - There are associated unit tests
ci_validate.shexecutes without error
If I accept your pull request, I will provide proper attribution on this site.
Key Takeaways
- Writing code deepens one’s conceptual understanding of algorithms and data structures.
- To get started, clone the code from GitHub to your local machine:
git clone https://github.com/dalealleshouse/algorithms.git - There are two development options: configuring your own environment or using the supplied containerized environment. Set up the tools for whichever option works best for you.
- All build and test instructions are listed here
- The code is validated via linting, static analysis, unit tests, and dynamic analysis. All validation checks must pass in order to submit a commit.
- It’s quick and easy to repeatably validate the code using the supplied
validation scripts.
  # configured environment
  ./validate.sh

  # containerized environment
  ./ci_validate.sh
-
Each algorithm page has a Source Code section that links to a GitHub hosted implementation in the
Cprogramming language. ↩ -
Don’t let this discourage you. Troubleshooting problems is one of the best ways to enhance your skill set. Dig right in! Feel free to submit a pull request so everyone can enjoy your enhancements. ↩
-
When setting up a software project, it’s always a good idea to create a containerized environment even if you do not intend on using it for local development. Containers are ideal for use in DevOps processes because they virtually eliminate configuration management problems. A thorough treatment of the topic is beyond the scope of this work; however, those interested should consult the book The DevOps Handbook: How to Create World-Class Agility, Reliability, and Security in Technology Organizations ↩
-
With this option, all the tools listed under configured environment come pre-packaged in a container that can be built locally or download via Docker Hub. ↩
-
There are several other viable container engines such as Podman and Rkt. Essentially, anything capable of hosting an x86 Ubuntu 22.04 container is sufficient. ↩
-
The number 15 at the end of each clang tool indicates the version. You will need to specifically install the correct version if 15 is the not the default version for your distro. ↩
-
VIM is the Hideous Humpback Freak’s all-time favorite editor. ↩
-
Some less impactful files are omitted from the listing for the sake of brevity. ↩
-
A successful build will emit something similar to the output show below.
Run Summary: Type Total Ran Passed Failed Inactive suites 100 100 n/a 0 0 tests 617 616 616 0 1 asserts 14174 14174 14174 0 n/a Elapsed time = 1.006 seconds -
The release build specifies optimization level O3. Additionally, it enables safe stack and control flow integrity which are clang utilities that thwart common runtime hacking attempts. ↩
-
Open
code_coverage/index.htmlwith your browser to view report ↩ -
Typically, projects require separate commands for build and test. This makes sense when the final deliverable is an executable or library. This final deliverable for this project is source code combined with the tests. ↩
-
https://en.wikipedia.org/wiki/With_great_power_comes_great_responsibility ↩
-
The ability to quickly and reliably validate software is a tenet of DevOps. ↩
-
Technically, linting is also static analysis. It’s pertinent to bifurcate the two in order differentiate stylistic analysis from error\security violation analysis. ↩
-
This is not an issue with tail call optimized languages given that the function is written correctly. Clang does have a tail call optimization feature which could be used to mitigate this issue. However, it would require testing. ↩
-
For the purposes of this project,
rand()is sufficient; however,rand()is not ideal for all applications. Eternally Confused has a great article about why this is true. ↩ -
For example, the list data structure actual run time code files are:
-
In order to avoid anomalies, each recorded runtime is the median of three separate execution times. The python program executes the operation time function, located in
alogi_timer.c, three times for each recorded result. ↩